Nikon Eclipse 50i Microscope (part 1)

This is a big subject and will have to be divided up into several stories.
Having had so much fun taking extreme macro shots with the likes of the Canon MP-E 65 Macro, I had become very curious about going all the way and using a proper microscope. Web sites such as Nikon’s www.microscopyu.com or www.microscopy-uk.org.uk really whet my appetite and I kept trying to learn about the techniques and tools necessary to duplicate the fantastic images I saw.
My first stop was the Nikon Model H, probably the best portable microscope ever made, of which I acquired several units and used occasionally during the last year. While it is possible to take good photographs with the little Model H, I was looking for more and kept searching.
The most confusing part is that a professional microscope is usually intended to do a single task well and is built to order using a bewildering array of optional accessories. Having had such a good experience with the Model H, I decided to stick with Nikon which made an affordable multi purpose microscope, the Eclipse 200, which I thought would satisfy my needs for less than £2,000.
I found a distributor in the UK, John Groulef of Microscopy Service and Sales Ltd., who was willing to take me by the hand and help me build the machine I needed. It took us more than a month to carefully make the selection and even thus, I had to send back a few parts for an upgrade after I had received them. My main concern was to be able to swap between objectives and illumination techniques quickly. This ruled out the E200 which only had a four slot turret and led me towards the E50i which could accommodate six objectives and also had a rotating turret for all the stops needed for dark field and phase contrast illumination. The end product cost almost £6000, ex VAT, but is quite a powerhouse.
I selected simple achromatic objectives (apochomatics would have doubled the bill) in 10x, 20x, 40x, 100x oil and 20x and 40x phase contrast thus filling out the six slot turret. I am still upset I didn’t have space for a 4x but I will have to live with it. The condenser turret has a bright field opening with its own iris, a darkfield stop, Phase contrast 1, 2 and 3 and a completely closed, no light option. The illuminator has a variator with a one set switch, and a built in ND filter. There is room for one filter just above the light, and another one just below the condenser. I added a pair of good 10x oculars on a trinocular head with a rare and little known Nikon SLR adapter.
I had found the latter buried deep inside Nikon’s documentation and it took weeks to obtain but I thought that using a DSLR would be a better option for a photographer than using the very expensive and somewhat limited CCD cameras Nikon normally sells with its microscopes. I was lucky as Nikon came out with the perfect camera for the job while I was waiting for my microscope: the D5000. A slightly revised version of the well considered D90, the D5000 adds an extremely useful articulated LCD screen, a movie mode and live view, all important for the application. The DX sensor format works well as it captures about 80% of the circular image, making the best use of the available resolution and the images are, of course, of excellent quality. The camera also has a video output so the image can be seen live on a TV screen and it works with the Nikon Camera Control Pro capture software. I will give a try outputting the video to a TV as Camera Control only shows a rather small image, not quite good enough for precise focusing. The articulated LCD is very practical but its resolution is not great and makes precise focusing difficult as well. The microscope trinocular was designed to be parfocal however and, normally, whatever is seen through the oculars is what will show in the camera. The specimen I experimented with had too much depth to allow for precise focus and to check whether everything worked as advertised.
I was a little bit disappointed with the general quality of the microscope. There is little of the perfectly machined and delicate mechanics you find in a high end camera. There are many plastic and cast metal parts that fit into each other without precision and are adjusted with screws. Some filters are just pieces of glass you drop into a hole. Others just snap on, no screws or bayonet. On the other hand, this is pretty much the standard in the microscope industry and those devices have an excellent track record of being used every day for decades. A good microscope will still have a useful market value 20 years after it has been manufactured. So I wasn’t impressed, but I am sure it will do the job.
A few words about my selection. At that end of the market, there are really only four players: Olympus, Leica, Zeiss and Nikon. They all make products of very similar quality and prices, mostly manufactured in China except for the most esoteric ones. The Chinese, probably in the same factories, make their own brands, which usually retail for one fourth to one tenth of the prices of the big four. I didn’t want to take the risk but for anybody wanting to experiment without spending a fortune, they would make a good choice. After all, they are professional microscopes used in laboratories around the world.
As for choosing between the big four, it usually comes down to which one makes a model closest to your own “sweet spot” although, in practical terms, laboratories tend to go for the reseller they have the best relationship with and, when the individual worker has a say, which machine is the most comfortable to work with.
Part 2 will be hands on.
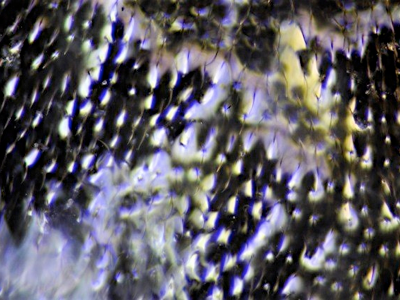
The photograph is of a fly’s wing at 400x with angled lighting.
1 June 2009